
The definitive guide to creating a photography website and things to note before you start to avoid beginner mistakes as much as possible.
If you have the talent to capture exciting moments with your camera, then creating and launching a photography website is probably one of the best things you can do.
In this guide, I will tell you how to create a beautiful photography website. One of the most difficult parts of any new business/project is to find and attract potential customers.
And this is probably why a photography website might be useful for you. Think about it:
- Without a photography website, only your circle of friends, direct customers, or social network subscribers will know what you are doing.
- With a photography website, the whole world becomes your market. You make your work and services available to all who use the Internet.
Advantages of Photography Website
There are various advantages of creating a website for your photography work:
- A portfolio can be impressive and will help you to sell;
- It is easy for a client to find information about prices and other working conditions;
- The site forms a personal brand and a professional image;
- Ability to sell your masterclasses.
- More convenient to work with clients. For example, create private photo galleries on the site. Upload files and send a client a link to the page and a password to access it.
- Building trust. You can create a review page and add a form so that other customers can share their impressions of working with you. You can also blog and post.
All this allows you to develop your business more professionally. Think of it as an introduction to business, but only on a global scale.
In this article, you will find information about how to create a photography website and things to note before you start. So, you can avoid popular beginner mistakes as much as possible.
Website Builder vs CMS
There are plenty of possibilities to build a photography website. The most popular are CMS (content management system) and website builders optimized for photographers.
The Most Famous Website Builders
- Wix – Wix is a popular website builder that offers a fairly large number of tools that are incredibly easy to use.
- Nethouse – Nethouse Builder is focused on creating one-page websites for small businesses. A distinctive feature is the variety of patterns. In addition, there is the possibility of integration with programs 1C and various services.
- Squarespace – Squarespace is a popular website builder that is also easy to use and allows you to use various stunning designs.
- Novi Builder – Novi Builder offers a huge number of HTML themes that can be obtained at an affordable price.
The Most Famous Free CMS Software
- WordPress – Without a doubt, WordPress is the most popular platform for creating websites all over the world. Approximately one-third of all websites on the internet are using WordPress CMS.
- Joomla – It is a multilingual platform written in JavaScript and PHP. Using the presented tools, you can create landing pages, online stores, information portals, and forums.
Both solutions have pros and cons and you decide which solution will best meet your needs.
But the most accessible and most common is undoubtedly WordPress CMS. It is free and very versatile. This CMS is successfully used to create small sites and large portals. Therefore, to create a photography website WordPress CMS fits perfectly.
Domain Name And Web Hosting
Now you need to come up with a short and memorable domain name. It is not easy to make, because it should reflect the whole essence of the platform and at the same time be original.
After the domain is invented, another problem will arise – the choice of hosting, which will accommodate the resource. Most of the websites based on CMS are hosted on shared hosting, which is a good basis for many projects.
Pros are:
- Low prices,
- Easy operation.
But there is a better opportunity – cloud hosting, its advantages:
- Low prices – The number of server resources is automatically selected for a specific project.
- Stability – Unlike virtual, cloud hosting is a network of servers with various functions. This approach eliminates the inhibition or inaccessibility of the site.
- Security – Due to excessive redundancy, the physical failure of a server or a whole cluster does not affect the work.
Technically, cloud hosting has more efficiency because of data distribution, a backup approach, and the ability to change the size of a network of servers in real time.
Economically, cloud hosting is an opportunity to reduce costs. I recommend paying attention to SITEGROUND WEB HOSTING. Their hosting services are industry-leading with 0% downtime. It is known for its 24/7 online support and services.
Free Theme Is Not Always A Good Idea
When you first access WordPress CMS, you will probably be a bit shocked by the sheer number of theme options. Most novice site owners or blog authors choose free themes because this is their first experience in online business.
Free – does not necessarily mean low quality, but you can’t call it good either.
Although free WordPress themes are a great option for many people, there are some reasons why you can choose a Premium WordPress Photography Theme instead.
Free VS. Premium WordPress Themes
| Free WordPress Themes | Premium WordPress Themes |
|---|---|
| Limited or no support team; you are on your own. | Efficient support; developers offer help as needed. |
| Fewer features and functionality. | More features; include essential plugins and designs. |
| Many sites with the same theme; less unique. | Many sites with the same theme; are less unique. |
| Possible hidden external links are difficult to remove. | Clean and professional without unwanted external links. |
| Difficult to find a theme that balances design and features. | User-friendly; balanced design and functionality. |
| Limited ability to change the default design. | Flexible design options for customization. |
| Not specifically optimized for SEO. | Better configured for SEO, enhancing online success. |
| Generally less user-friendly. | Enhanced user experience. |
Pick And Install A Theme
Finding the right theme may take some time. Our recent post on 5 Stunning WordPress Photography Themes might be a good starting points.
How To Install Theme In WordPress CMS
Follow these steps to install your chosen website theme in WordPress:
- Go to Control Panel Appearance > Themes.
- Click the Add New button.
- Write the name of your theme in the search bar (or use the Download Theme button if you have an archive).
- Click Install and then Activate to apply it.
Then go to Appearance > Settings to change a header, footer, sidebar, website identification, etc.
This step-by-step video by WPBeginner will guide you through the process of installing a WordPress theme.
That’s all you need to choose and design a great look for your new photography website.
Install Plugins
Next, you need to add some basic features that you can do by installing WordPress plugins. Here are some of the best you should use:
- Contact Form 7 – It is important to give your visitors the opportunity to reach out. Using the contact form, everyone can do it right through your page.
- Envira Gallery – An important task for each photographer is to demonstrate their work. The WordPress Photo Gallery allows you to do just that!
- Yoast SEO – All-in-one is a tool that will help with all your SEO needs. From sitemaps and canonical URLs to meta headings and descriptions, you can customize it all.
- TinyPNG – Although good image/photo quality is important, it can greatly affect the performance of your site. And since there are many such files on the photo website, it is recommended to use image compression.
Customize Photo Gallery
Each photography website needs a gallery to showcase the awesome moments you captured. If you installed Envira Gallery (there are also many alternative plugins), this will be easy to accomplish.
Here’s how you can create the best image gallery ever.
- Select your photos and export them using your Photo Management Software.
- Optimize them with TinyPNG for maximum performance.
- Go to the section Envira Gallery on your panel.
- Click the Add New button.
- Upload photos from your computer (or from other sources).
- Save the gallery and you will receive a shortcode.
- Insert a shortcode in the message to make your gallery appear.
Create A Page About Yourself
Another important component of your website photography will be a story about yourself.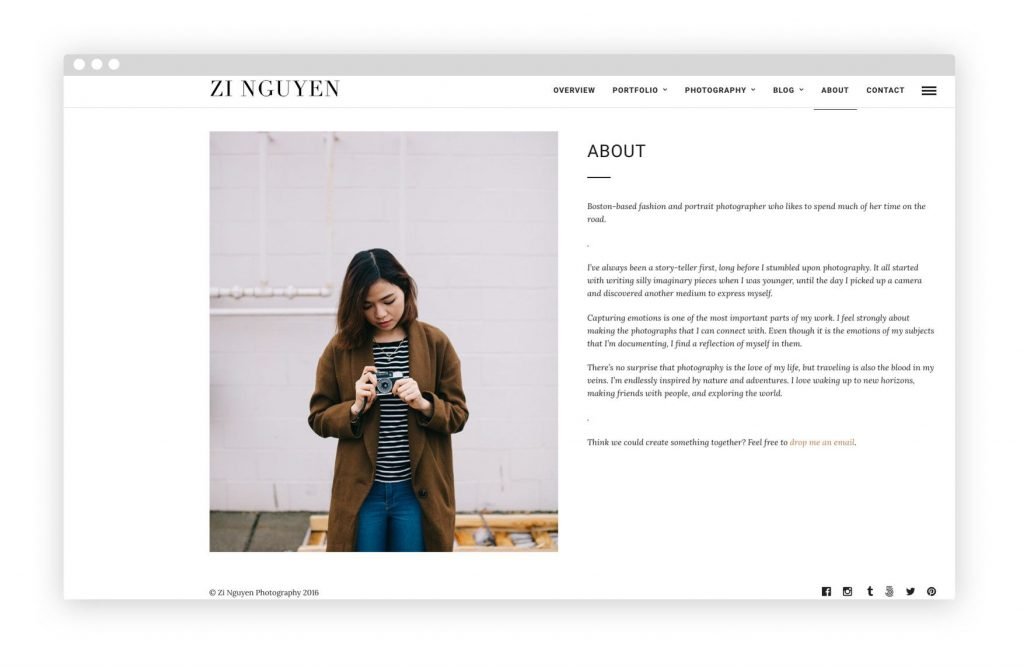
You can do this with a simple “About Us” page. To create a terrific description, follow these tips:
- This page should be short, simple, and attractive.
- Try to express your passion for photography.
- Tell the world why you are better at what you do.
To get started, go to Pages > Add a new Page and create a new draft with an image and a short biography.
Create A Contact Form
One of the main tasks of your website on photography will be to get potential customers and new business opportunities.
For this to happen, your visitors need a way to reach you. Therefore, you need to customize the contact form.
You can do it quickly and painlessly using the WPForms plugin. After you install it, go to Control Panel > WPForms > New form and set up a new form.
You will also find several basic themes there to simplify the process. After creation, you will find a shortcode that you can insert into the page/message so that the contact form appears.
Integrate With Social Media
Being active on social media is a great way to gain trust and increase brand awareness. If you do not have a presence on social networks, it is important to start right now.
Sign up on Facebook, Instagram, and Twitter and start creating your loyal audience.
In addition, you can integrate your website for a photographer and social network profiles using plugins, such as SuperSocializer and Blog2Social (for the automatic exchange of articles).
Since your goal is to have as many interactions as possible, this is a step in the right direction!
Ready-To-Use Website
If you find this guide and tips very difficult and you want to make it simple, then here is an opportunity for you – A ready-to-use photography website.
It will make everything for you. This service will help you to get a hosting, and domain and installs a theme that you will pick.
There are plenty of them on any taste. All necessary plugins will be installed. If you want, they can change the color of the theme. Your website with filled-out pages will be ready within 6 days.
All you need is to tell a contact manager how you want it to look. It is simple and quick. And, of course, it is much cheaper than if you make it at a web design studio!
And One More Thing!
Your portfolio is the most important thing on your website. Here are a few tips to make a perfect portfolio:
- Decide on the target audience. It will be easier for you and your customers.
- Choose high-resolution images. Clear large images are ideal for sharing on social networks. They produce the desired effect on the viewer and give your portfolio a high-quality look.
- Highlight the areas in which you wish to create a portfolio. Divide by topic.
- Decide on the number of works that you want to show.
- Focus on quality, not quantity.
- Show off your most unique and creative work.
- Be selective. Don’t add all the photos that you have. Only the best.
- Do not include everything in your portfolio.
Conclusion
So, we looked at how to create a simple photography website quickly using WordPress CMS and Themes. This is a great opportunity for ordinary users not to overpay web studios and create a project with their efforts and without much knowledge.
Website development is long and hard work. Visuals are Vital as they are processed 60,000 times faster in the human brain than text. Therefore, this video by Tyler Moore is a visual representation of how to set up a WordPress website.
The video will guide you through the process of buying the domain and hosting setting it up with WordPress CMS, installing essential plugins, and making contact forms.