
A step-by-step detailed guide on how to download and use the J2K plugin to create JPEG 2000 image files with Adobe After Effects.
JPEG 2000 is a new image coding system that uses state-of-the-art compression techniques based on wavelet technology. It is also known as J2K.
Cinema Projection uses this format, and filmmakers have to convert a film into J2K format to project it on the screen. The file extension of JPEG 2000 can be J2C, JP2, or JPX.
However, for Digital Cinema purposes, the J2C file extension is used.
Filmmakers convert a film into J2K in image sequences, then they process these sequences in an MXF file and bundle them with other required audio and data files to create a Digital Cinema Package or DCP.
There are tools through which we can create JPEG 2000, such as OpenDCP. However, in this article, we will be using a third-party Adobe After Effects plugin to render out the J2K Image Sequence.
Download JPEG 2000 or J2K After Effects Plugin
The J2K plugin reads and writes JPEG 2000 files. Because “JPEG 2000” is a mouthful, most people refer to them as JP2 files. JPEG 2000 is meant to succeed JPEG. It serves the same basic purpose as JPEG: lossy compression of photographic images.
The main difference is that JP2 uses wavelet compression instead of the DCT (Discrete Cosine Transform) compression found in JPEG. The result is that while heavily-compressed JPEG files exhibit chunky artifacts, JP2 artifacts are soft and blurry.
Ultimately, you can achieve an image with the same visual quality using less data.
JP2 also supports a lossless compression mode (similar to PNG), alpha channel transparency, and 16-bit color, among other things. To produce JPEG 2000 with After Effects, you need to install this third-party plugin inside the plugins folder of Adobe After Effects.
The package also contains JPEG 2000 plugins for Photoshop and Premier Pro. For more information, read the manual inside the download package.
How To Render JPEG 2000 With After Effects
Rendering JPEG 2000 with After Effects is very easy, It is indeed similar to any other render settings in After Effects.
Step 1 – Add Your After Effects Project In Render Queue
Once you install the plugin, start After Effects and load up your project or composition. Once you finish your editing work, you should add the composition to the Render Queue by going to Composition > Add to Render Queue or by using the keyboard shortcut CTRL + SHIFT +/.
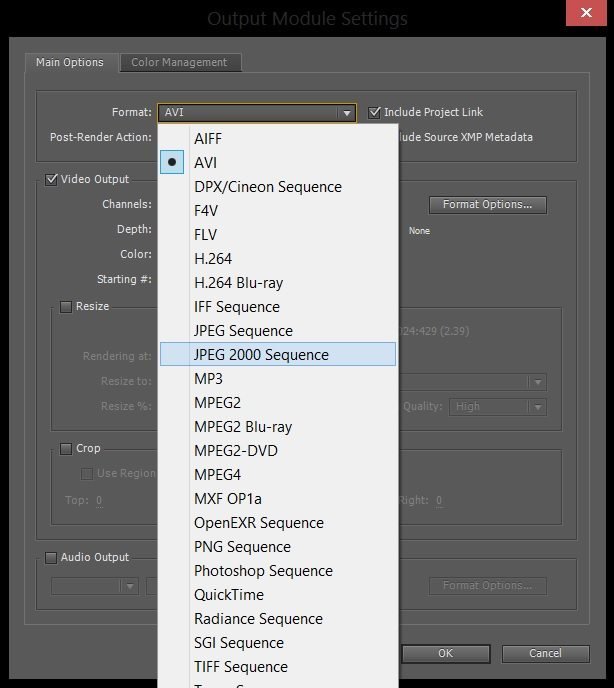
Step 2 – Select Output Module To JPEG 2000 Sequence
After you add your composition to the render queue, click on the Output module, and select JPEG 2000 Sequence from the format drop-down menu.
Step 3 – Change Format Options
Now click on Format Options to open the J2K options panel. From there, you can set the format options of your output file.
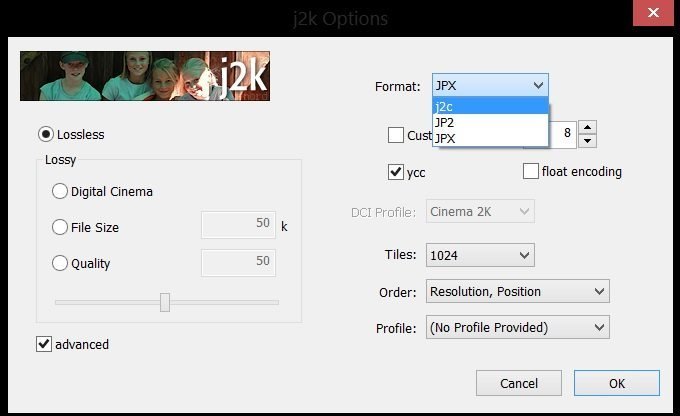
There are four ways j2k can determine how much to compress the JP2 file it creates.
- Lossless means that the pixels will save without making any changes whatsoever, and the file will shrink as much as possible, depending on the image content.
- Digital Cinema specification calls for 12-bit JPEG 2000 frames encoded in XYZ color space with a 2.6 gamma. The final form of a DCI file is an MXF container, but j2k will let you generate .j2c frames to be passed on to a tool like OpenDCP to do the rest.
- File Size lets you specify the size of the resultant file; the bigger the file, the better the image fidelity.
- Quality uses a custom formula to set compression levels based on a 1-100 scale with 100 being practically visually lossless, 1 being pretty ugly, and every level in between; the file size will depend on the dimensions of the image and its contents.
Step 4 – Render
After you select your appropriate specification, hit OK and render out the project in one separate folder since it will be generating images whose amount depends on the number of total frames in your composition.
Thanks For your information and this is nice
I am glad you found the article useful.
Thank You!
Most Welcome!